Introduction
This guide walks you through enabling Single Sign-On (SSO) for your drivers and operators in NAV PRO, using Microsoft Entra ID (formerly Azure Active Directory).
Before you start, make sure you have:
- Full admin access to your NAV PRO portal
- Global Administrator or Application Administrator access in Microsoft Entra ID
- About 20-30 minutes
You'll be moving five values between NAV PRO and Microsoft Entra during this setup:
| Value | Where you get it | Where it goes |
|---|---|---|
| Tenant ID | Microsoft Entra → Properties | NAV PRO SSO page |
| Application ID | Enterprise Application → Overview | NAV PRO SSO page |
| Client Secret Value | Certificates & secrets → New client secret | NAV PRO SSO page |
| Reply URL | NAV PRO SSO page | Microsoft Entra Basic SAML Configuration |
| Role ID | Custom role you create in Microsoft Entra | NAV PRO SSO page |
Keep this table handy — most setup issues come from mixing up which value goes where.
NAV PRO Configuration
- Log Into your NAV PRO portal, ensure the account you’re using as full admin access.
-
Open up more apps and select SSO
- For this guide we’re going to focus on Microsoft Entra Active Directory.
-
Select Connect under Microsoft Entra Active Directory
-
You’ll see the following page, keep this page open we will return to it after configure a few settings in Microsoft Entra ID (formally known as Microsoft Entra Active Directory)
- Enter your Microsoft Entra Admin Email address into the first field
Finding your Tenant ID
- Get your Tenant ID by going to your Microsoft Entra ID portal → Properties and find your Tenant ID. Paste that into your NAV PRO portal (see NAV PRO Configuration Step 5 above)
Microsoft Entra Configuration
-
Log into the Microsoft Entra portal and find Entra ID using the search bar. You should see something like this.
-
Click Add → Enterprise Application
-
A pane will appear on the right. Enter “Trucker Path” as the name and ensure the last option is selected: Integrate any other application you don’t find in the gallery
- Then Create your application
- Congratulations you have created the application! Hang tight, we’re not quite done yet.
- Copy the Application ID and paste it into the corresponding field in your NAV PRO Microsoft Entra setup module
-
Click Set up single sign on
-
Select SAML
-
Edit Basic SAML Configuration
-
Press Add Identifier and enter truckerpath as one of the identifiers
-
Go back to the NAV PRO page we opened up earlier. Copy the Reply Link
-
Paste that link into the Reply URL link in the Microsoft Entra Entra ID portal.
- Click Save and close this pane
-
Navigate back to Microsoft Entra ID main dashboard by clicking this:
- On the left panel find App Registrations → All Applications
-
Select your recently created application
- Select Certificates and secrets from the left panel
-
Navigate to Client Secrets → New client secret. Fill in the fields below accordingly and click Add
- Microsoft Entra will show two values after you create the secret: Secret ID and Value. Copy the Value, not the Secret ID, and paste it into the Client Secret field in NAV PRO. The Value is only shown once, so grab it now before navigating away.
Role Configuration
For configuring roles you will have to create a custom role for your users. For more information see here.
- Once you have setup your custom roles.
-
Sign in to the Microsoft Entra admin center as at least a Privileged Role Administrator.
-
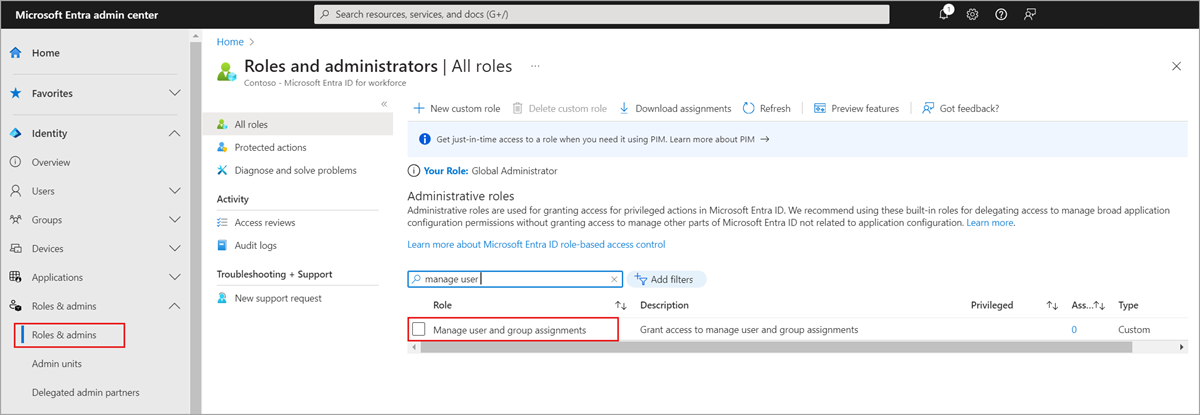
Browse to Identity > Roles & admins > Roles & admins.
-
Select the Manage user and group assignments role.
-
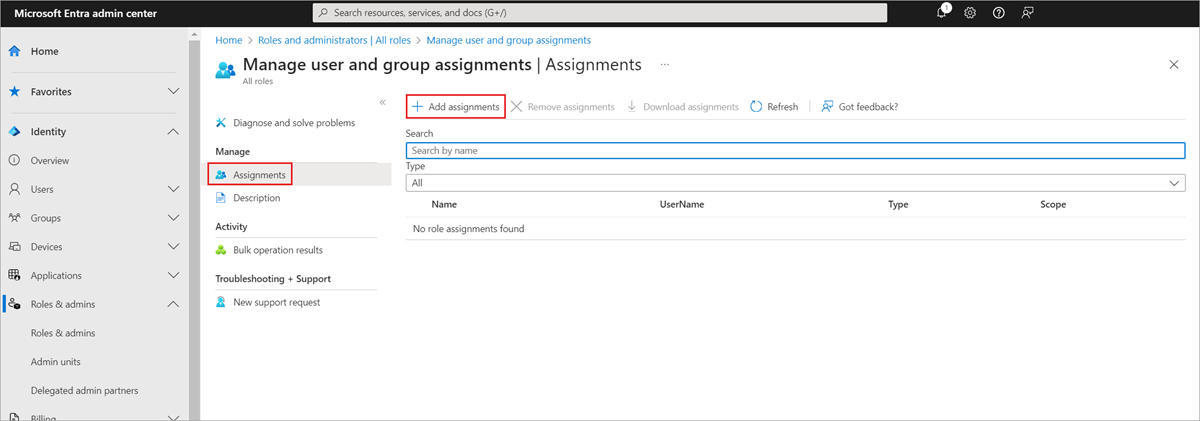
Select Add assignment, select the desired user, and then click Select to add role assignment to the user.
- To grant permissions to assignees to manage users and group access for all enterprise apps organization-wide, start from the organization-wide Roles and Administrators list on the Microsoft Entra ID Overview page for your organization.
- To grant permissions to assignees to manage users and group access for a specific enterprise app, go to that app in Microsoft Entra ID and open the Roles and Administrators list for that app. Select the new custom role and complete the user or group assignment. The assignees can manage users and group access only for the specific app.
-
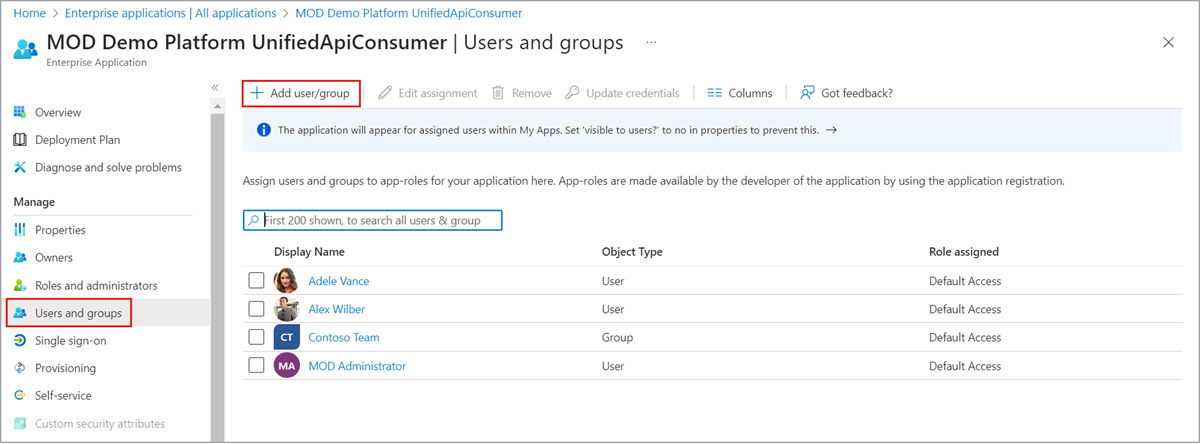
To test your custom role assignment, sign in as the assignee and open an application's Users and groups page to verify that the Add user option is enabled.
- Once the role is created and assigned, get the role ID and add it to the fields in the NAV PRO portal.
- Press Save and allow 10-20min for everything to connect.
Troubleshooting
Login still failing after 20 minutes? Double-check that the Reply URL in Microsoft Entra matches exactly what's shown in NAV PRO, and that you entered the Client Secret Value, not the Secret ID.
Users can't be assigned to the app? Confirm the custom role was created and assigned before adding the Role ID to NAV PRO.
Comments
0 comments
Please sign in to leave a comment.